|
|
Pushback Settings An explanation of fields and properties |
Pushback Settings: All Pit Options and Mining Width Control
To access this dialog:
-
Using the Optimization control bar, select Pushbacks | Settings and either the All Pit Options or Mining Width Control tab.
The parameters defined here apply to all pushbacks. Pit Optimizer OES is the key input to Pushback Generator.
There are three tabs available; All Pit Options (determine the final pit limits and set slope adjustment factors), Mining Width Control (to control the width value used for mining) and Size control (managing the size of generated pushbacks).
All Pit Options
Final pit limits: set to Ultimate Pit (the largest pit defined by Pit Optimizer OES), to a particular phase Pit shell (phase) No., or to a block in the optimal extraction sequence OES block no..
Maximum Pushback Number: enter a limiting pushback here. Pushbacks will only be generated up to this number.
Maximum pushback number: enter the maximum (inclusive) pushback number to be scheduled.
Recalculate starting at pushback: by default, when pushbacks are scheduled, scheduling starts at pushback 1. You can select this check box and specify a later pushback if you wish to reschedule without regenerating previously-calculated pushbacks. This is ideal for rescheduling part of the pushback plan, saving time in recalculations and preserving known acceptable data.
Slope adjustment for pit walls distinction ultimate pit walls
Allow slopes defined in ultimate
pit slopes by factor: only values between 0.5 and 2.0 are allowed.
If you enter a factor below 0.5, Studio NPVS uses 0.5. If you enter
a factor above 2.0 Studio NPVS uses 2.0
Mining Width Control
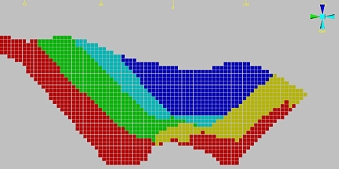
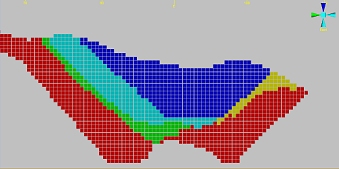
Mining Width: the minimum allowed distance between pushback boundaries (except when these boundaries coincide with the ultimate pit boundary). The distance must be defined in the same units as the block dimensions.
TheMining Widthis the key parameter affecting pushback creation. Relatively large values of this parameter may make it impossible to get pushbacks of desired size when strictly following the Ultimate Pit OES. The work around in such cases is to use the pushback adjustment tool.
Consider the
following example showing pushback shapes in section, where the Mining Width is constrained to 20 meters at the
top and 40 meters in the bottom image:


Control Mining Width on benches, the Final Pit may be smoothed: pushbacks are generated by checking the mining width on bottom benches. The mining width must be defined in the same units as the block dimensions.
Control Mining Width on benches, keep the Final Pit unchanged: pushbacks are generated by ignoring the mining width on the bottom few benches of each pushback. The mining width must be defined in the same units as the block dimensions.
Use old pushback generation method: up until NPV Scheduler version 4.19, this method was the only method available. In this case, pushbacks are generated using the methodology implemented in Studio NPVS version 4.19 and earlier by checking the mining width on the top bench of each pushback.
Add, if possible, disjoint pits...: if the size of a generated pit doesn't exceed a specified percentage of the target size set for the final conjoined/contiguous pushback, then a disjoint pit will be added. The default value is 40% and the possible range is 20% to 60%. If there are any pits with with mass less than the specified percentage, calculations will consider merging these to the corresponding pushback.
This option is only relevant if the mining width control is set using one of the first two options (Control Mining Width on benches...). The legacy option (Use old pushback generation method) applies only remnant surface control (see Remnant Control, below).
Update Ultimate Pit OES after a pushback if...: this tolerance setting allows you to set an upper limit on the overall percentage of blocks that are outside the current sequence before the UP optimal extraction sequence is recalculated. Setting a value of zero, for example, will force a recalculation if any blocks are found to be outside the sequence. The default is 2%.
Essentially, if enabled, you will recreate new nested pit shells and their corresponding Optimal Extraction Sequence (OES) after each pushback where the percentage of out-of-sequence blocks exceeds the value specified. If this is set to 0 (zero) a new optimized pit and OES will be created after each pushback.
Remnant Control: The Minimum remnant can be defined (surface area between ultimate pit and pushback boundaries) to control the volume between the pushback and pit boundary. The equivalent number of blocks is automatically computed.
Size Control
The parameters defined on the Size Control tab apply to individual pushbacks unless stated otherwise. Note that if a pushback is not listed in the provided table, the parameters of the nearest preceding pushback are used when no pushback boundaries are used.
To use pushback boundaries, they must be defined for each pushback. When using the same PB boundary between different pushbacks, each of the pushbacks will be listed in a separate row in the Size Control tab.
Pushback: the pushback serial number, for example, 1.
Control: select the size control variable from a list of previously defined variables.
Value: enter the desired minimum size in terms of the selected control variable; for example, 500,000 (tons). Note that the actual pushback size may exceed this value in order to satisfy other requirements
|
|
A pushback's size must be defined before pushbacks can be generated so it is important that at least one Value is defined. If you attempt to generate pushbacks with no Value field entries in the table, you will be warned of this situation and pushback generation will be cancelled. |
Bench Limit: optionally, set the pushback depth limit in terms of benches; see bench elevations for reference.
Adjustments: optionally,
select a previously defined pushback Adjustment
object. These objects are either created as the result of importing
boundary data or manually digitizing a boundary and applying it to
a section view, using the Apply
Digitizer Boundary dialog. When a pushback boundary is
generated by either of these methods, they will be available as an
item in this drop-down list. Pushback boundaries support an important
attribute that determines how the boundary is treated (the pit shell
cannot extend beyond the selected bench, the pushback cannot extend
beyond this bench etc.)
Find out more about Digitized Pushback Boundary Parameters...
The Value and Adjustment fields work together; for example, if the pushback boundary adjustment is set to the [PB Forced Limit] option in the Apply Digitizer Boundary dialog, and a value of 100,000,000 tonnes of rock mass is set as the Value, if the boundary adjustment includes less than 100,000,000 tonnes, the actual rock mass value defined by the boundary adjustment will be used, overriding whatever Value is defined here.
Edit Control Variables: edit or add pushback size control variables using the Define Control Variables dialog.
| |
Related Topics |
|
|
Copyright © Datamine Corporate Limited
JMN 20065_01_EN


